Docking Debugging
Access Switch Settings
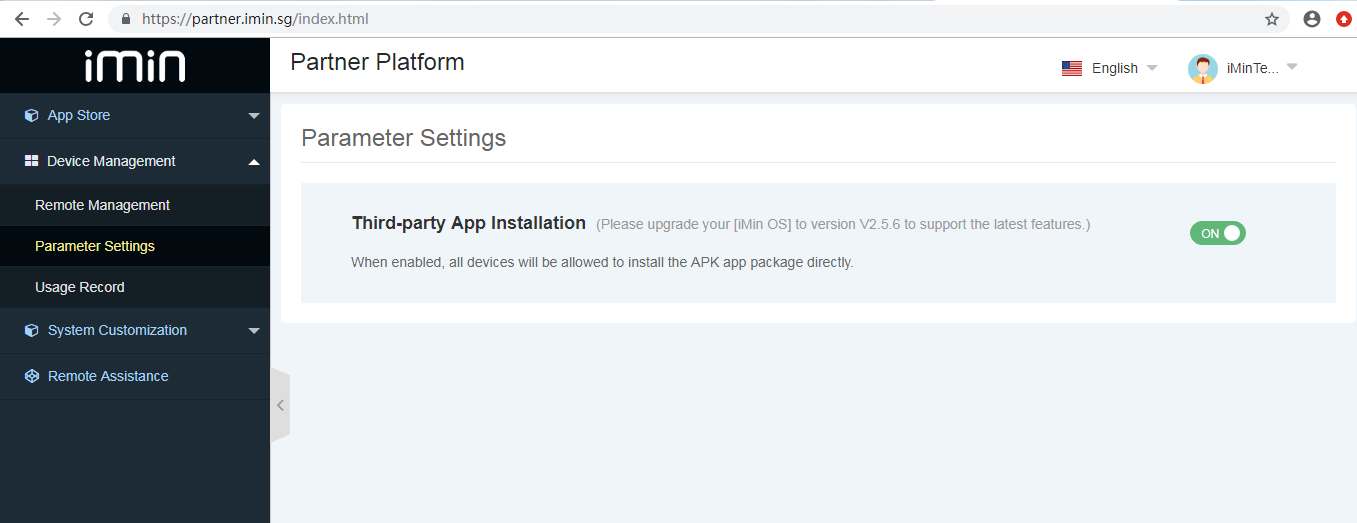
iMin devices allow third-party applications to be installed by default, and you can also restrict installation permissions through partners.
Open installation permissions
Partners can log in via https://kit.imin.sg to open or close third party APP installation permissions
Open Developer Rights
Enter Settings > About > Version
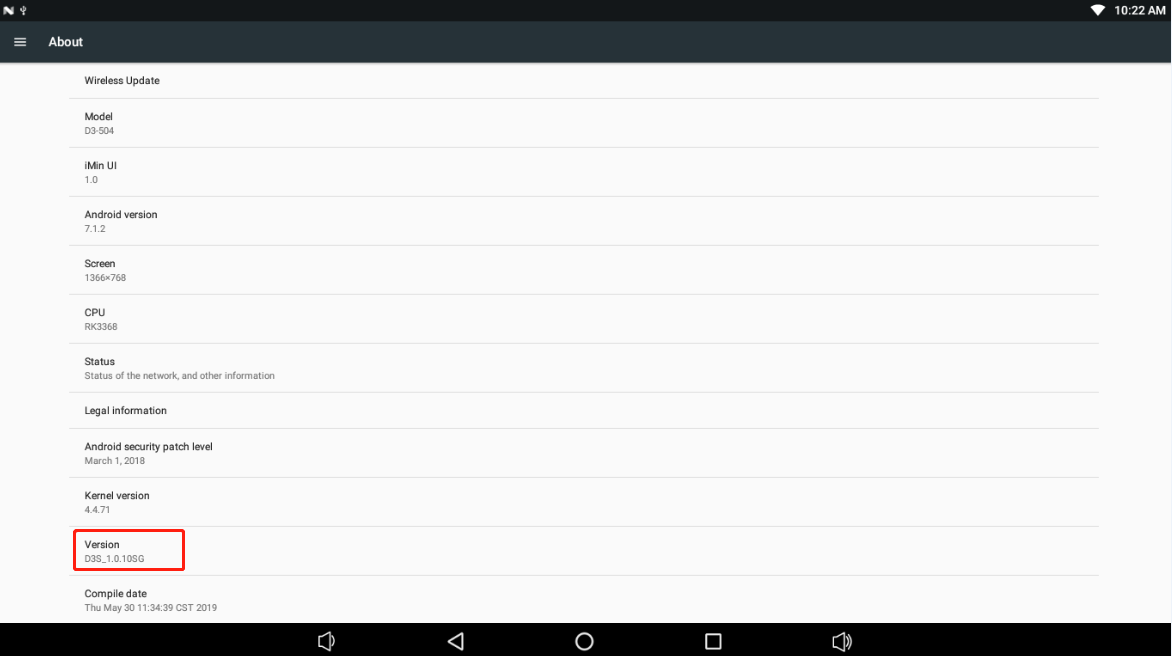
Click 5 times in a row to enter the developer mode
Return to the previous level and select the developer mode
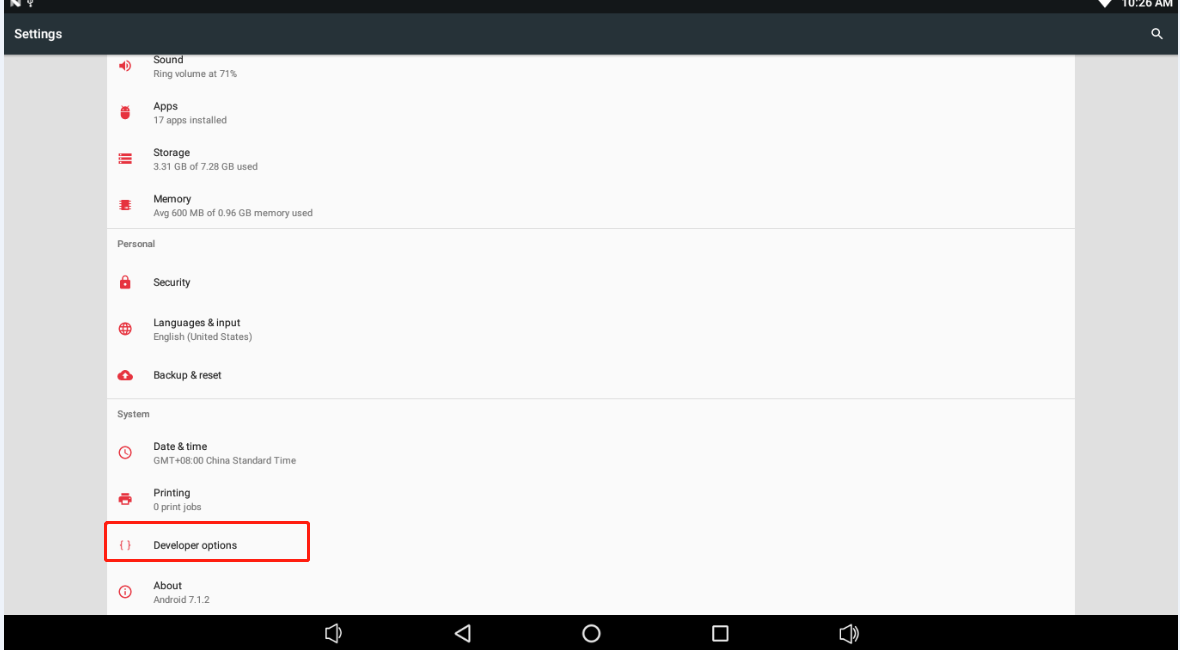
Open USB debugging interface

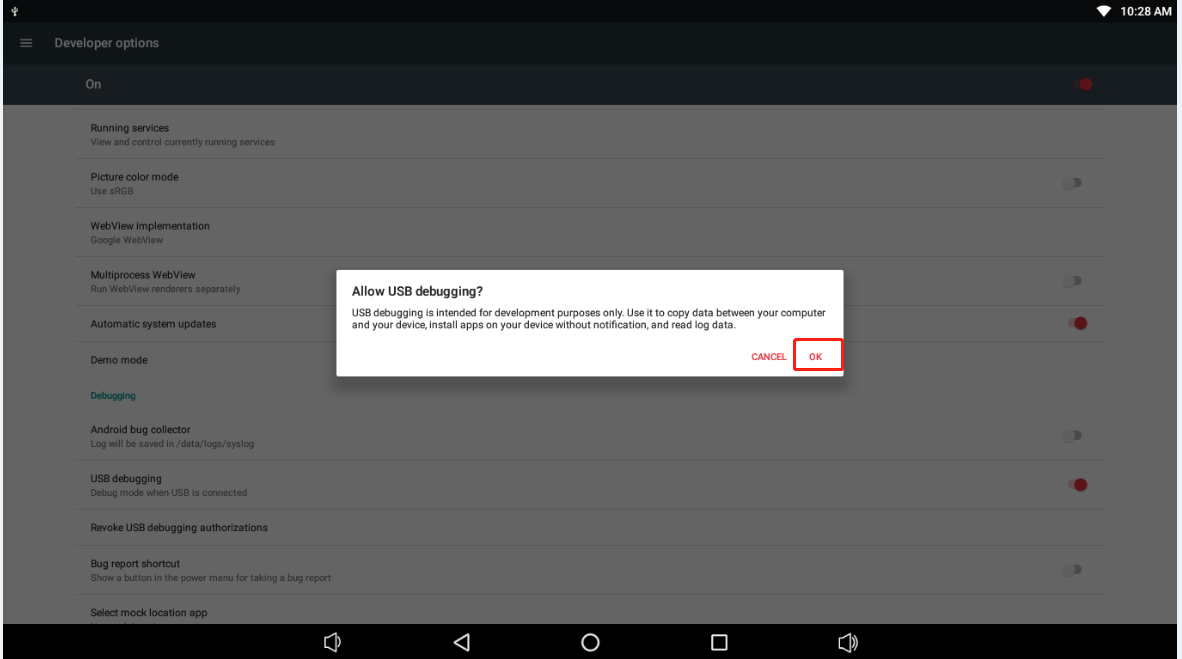
5.Finshed
Debugging Devices
You can debug after plugging in USB line to default iMin device. iMin has also provided the control function for device debugging permission. After the partner has enabled debugging permission control in the background (as shown in the following figure), it is necessary to obtain debugging permission via E-mail to debug this device. If you cannot directly debug, please check whether the partner backstage has enabled this permission.
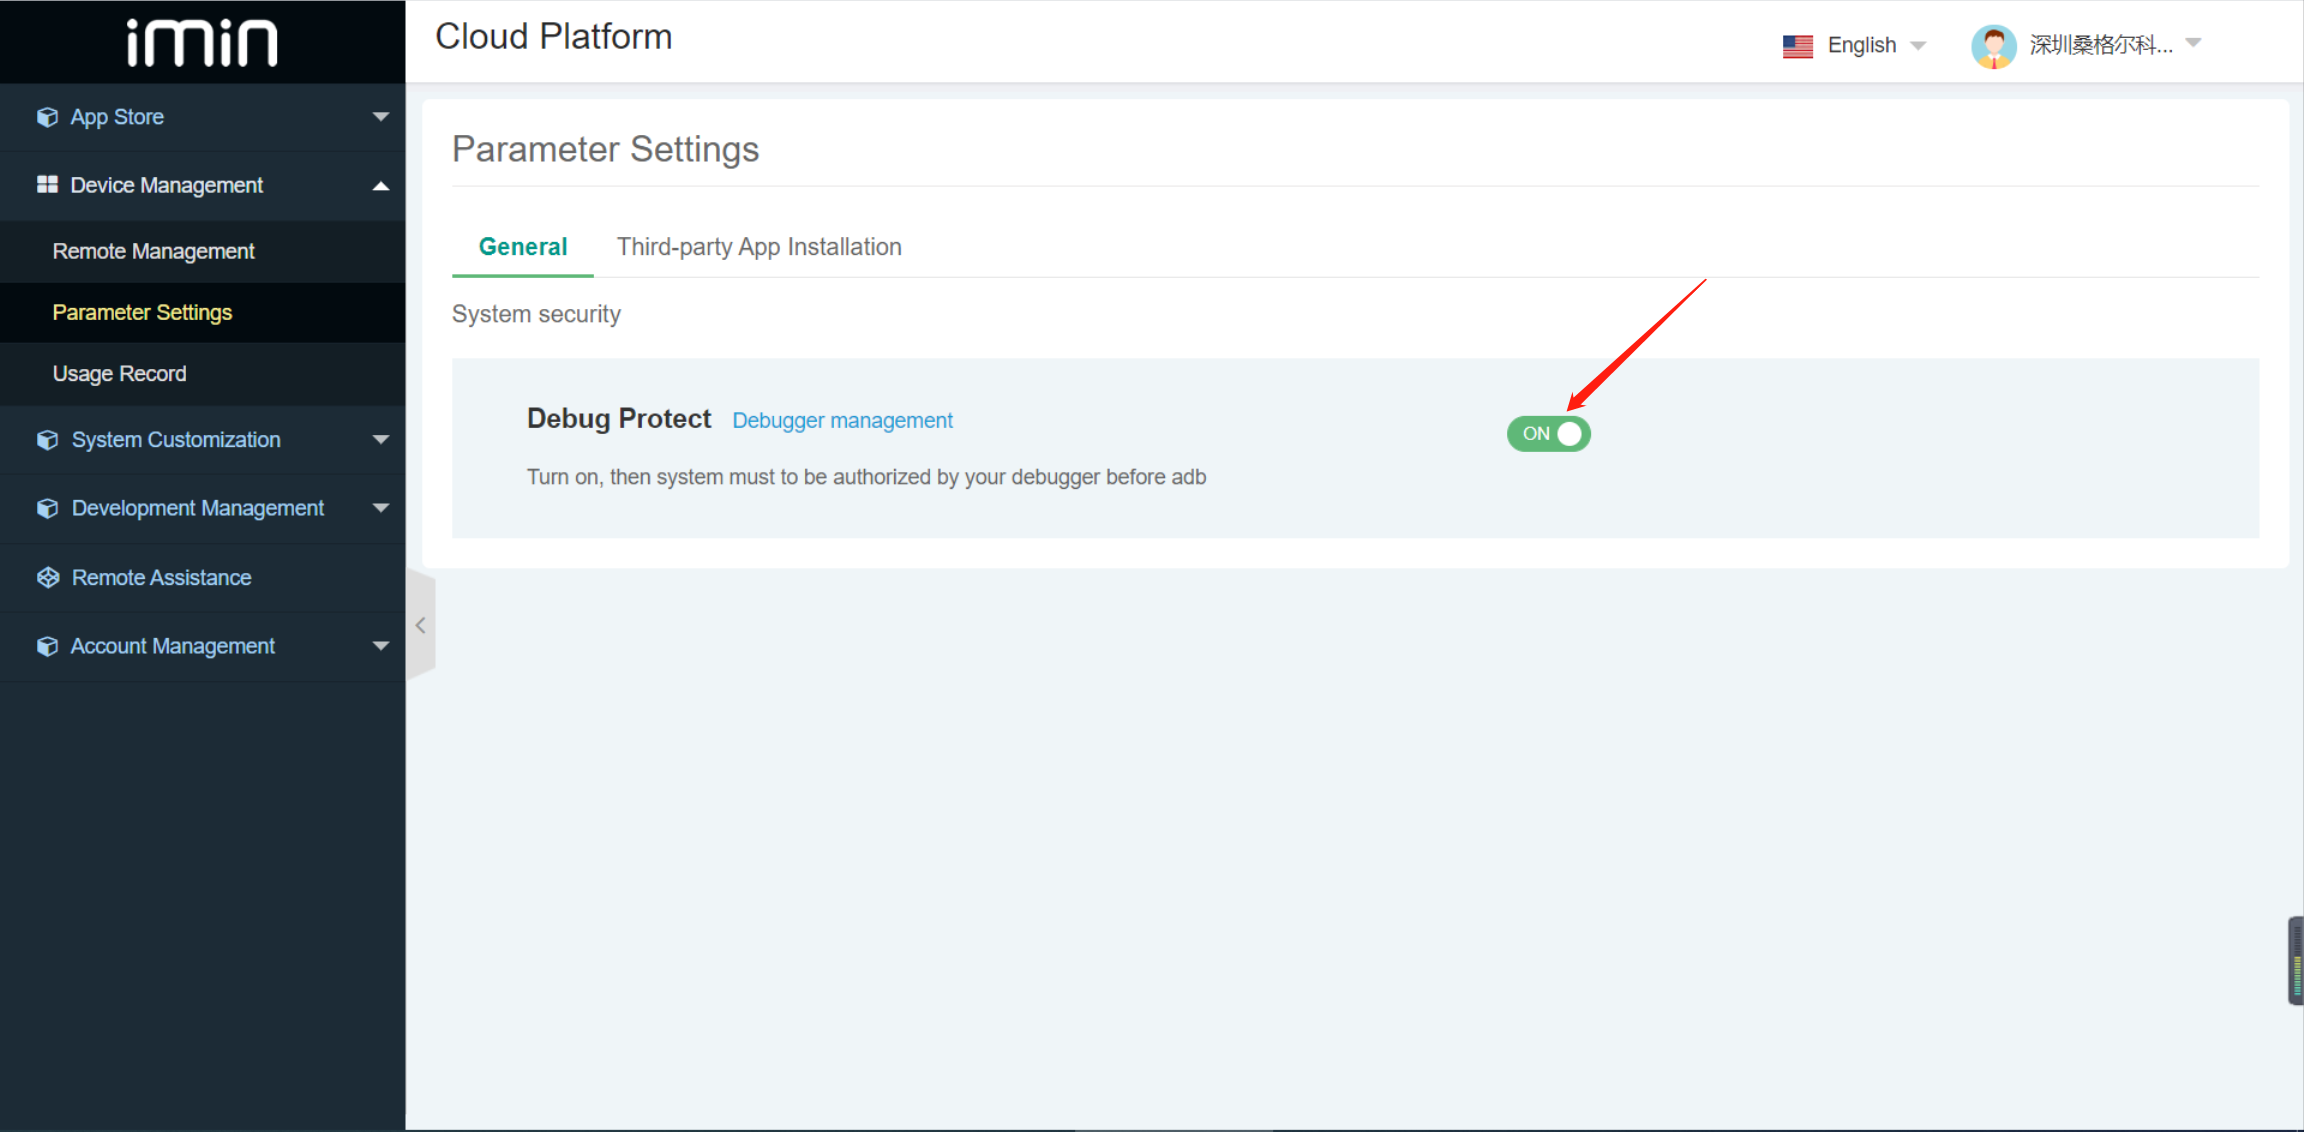
Note: the control of debugging permission takes effect only to the devices that have bound partners (channels).
How to debug device while the permission is on
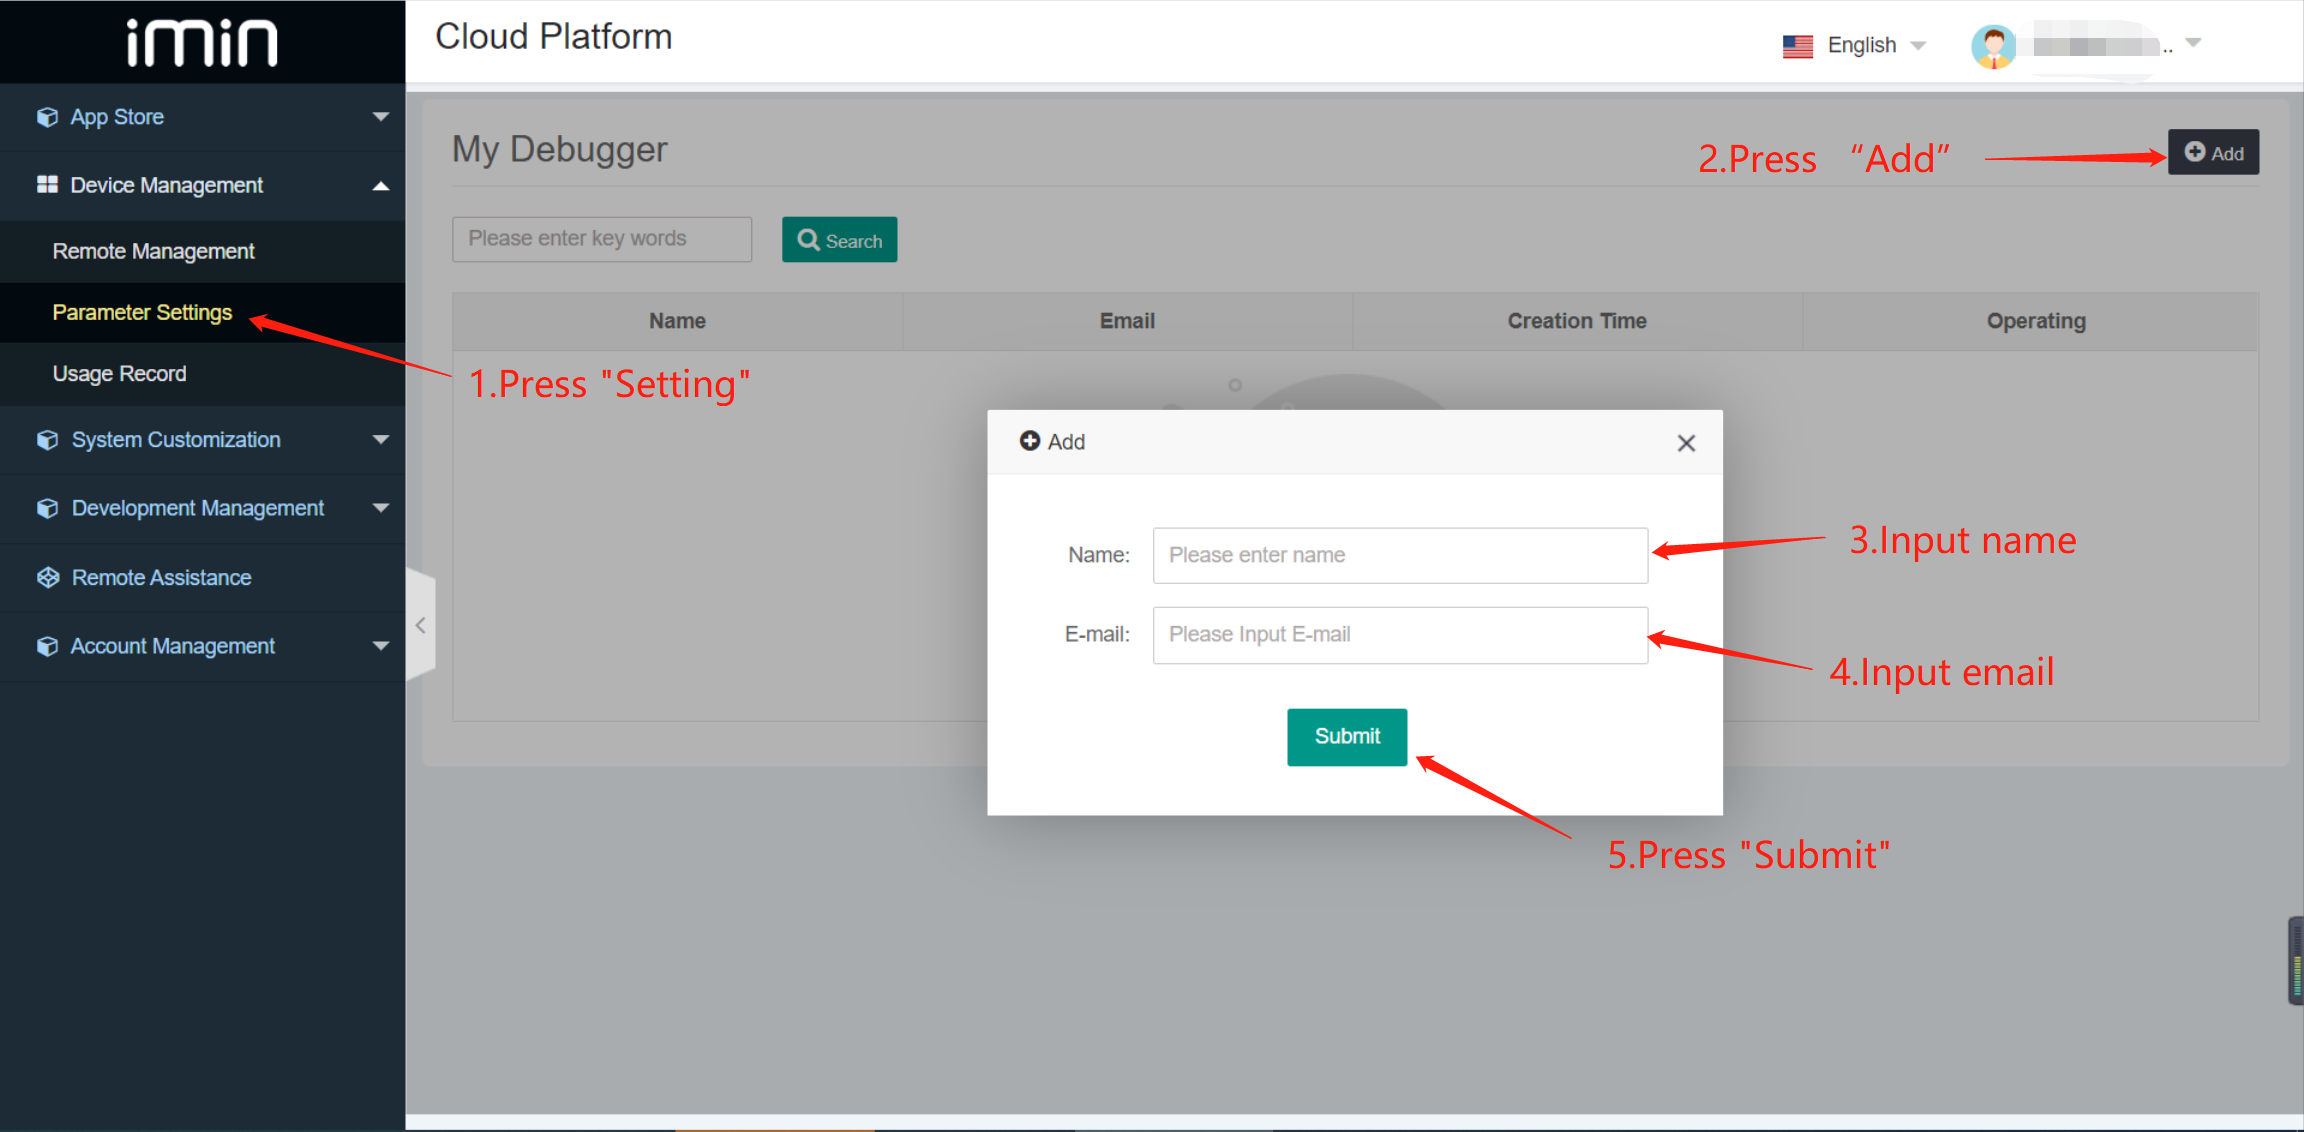
If the partner has enabled “debugging permission control”, the developer need to obtain the debugging permission via E-mail on his/her own device to debug the device. The partner can add the E-mail of the debugging personnel (developer) on the iMin partner platform. Steps to obtain the device debugging permission as follows:
1.Add debugging personnel
Before debugging the device, the developer is required to know the channel that the device belongs to. He/she can look for the management personnel relevant to his/her own company for inquiry. The management personnel needs to add the debugging personnel’s E-mail in iMin partner platform background.
Plug in USB.
Connect the device to the computer after confirming that you have your own E-mail for debugging permission. It is suggested that the developer debug under windows.
3.Get the veification code
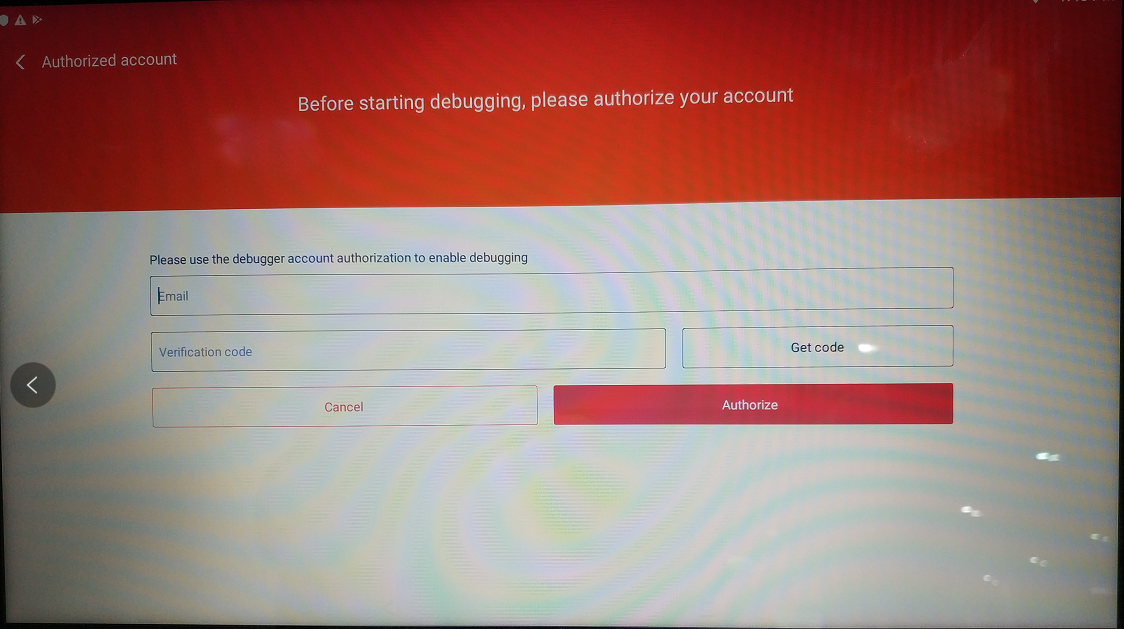
Click the above “USB debuging” item, you will enter the step of permission verification via E-mail. Meanwhile, the USB debugging mode of the device will be enabled by
Verify the permission

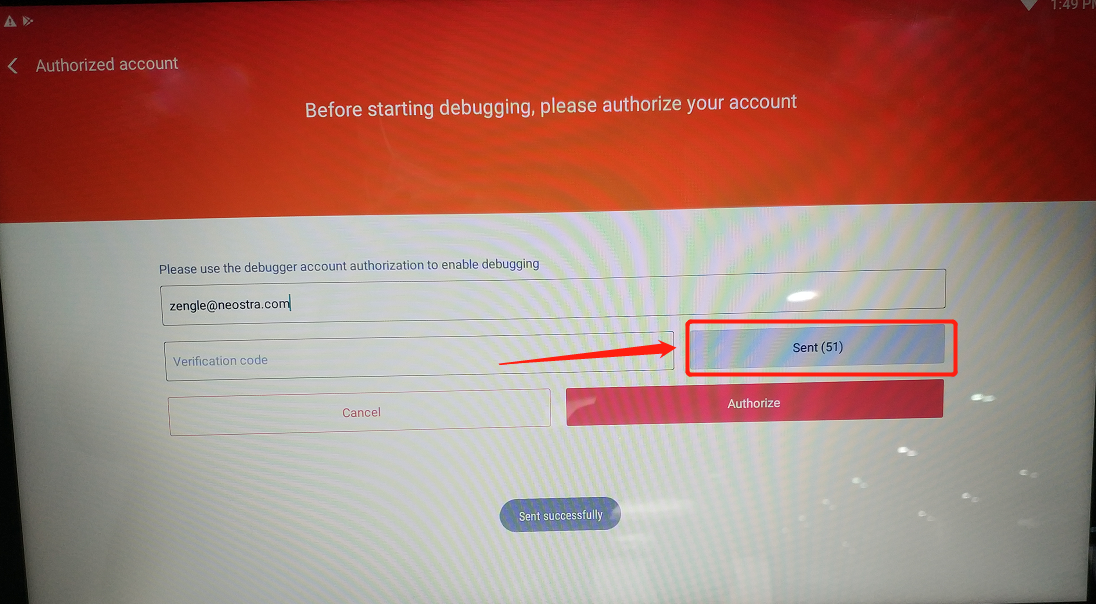
Click “Obtain the verification code” after entering the previously added E-mail. iMin will send the verification code to the E-mail. Fill in the verification code and click “Authorize and enable debugging”
The verification code is valid and reusable within 30 minutes, and it can be used any number of times.
After the device restarts, USB Debugging is automatically closed
5.Open the permission.
After opening the permission, you can check whether there is output in logcat to judge if it’s OK to debug the device.
Special Codes Description
Get iMin device identification
iMin recommends getting the following information to determine if it is an iMin equipment:
1.Brand name of the device(e.g. iMin)
The brand name of iMin is unified as iMin
2.System model of the device(e.g. D2-401)
The system model is composed of product model + hardware characteristics
Among them, starting with M is a handheld device, starting with D, S is a horizontal screen device
Download the IminLibs.jar package first, then reference it in the project, and obtain the specified value in the following way:
The code to get the brand is:
1String brand = SystemPropManager.getBrand();
The method to get the model is:
1String model = SystemPropManager.getModel();
The code for obtaining the SN number is:
1String sn = SystemPropManager.getSn();
Hide and restore the bottom navigation bar
Note
(Note: iMin has newly developed the Kiosk screen control mode. The APP does not need to be modified. The status bar and navigation bar can be hidden through cloud settings and cannot be called out by gestures. It is recommended that partners use iMin Kiosk screen control mode. Better experience)
The Android system provides a way to hide the navigation bar of the system by default, but the support for Dialog is poor, which causes the navigation bar to pop up and then hide (splash screen) when the full screen dialog is opened. iMin OS has fixed this problem
1.Activity full screen
——Android default support
1public class MainActivity extends AppCompatActivity {
2    @Override
3    public void onWindowFocusChanged(boolean hasFocus) {
4        super.onWindowFocusChanged(hasFocus);
5        SystemUIUtils.setStickFullScreen(getWindow().getDecorView());
6    }
7}
 1public class SystemUIUtils {
 2
 3    public static void setStickFullScreen(View view) {
 4        int systemUiVisibility = view.getSystemUiVisibility();
 5        int flags = View.SYSTEM_UI_FLAG_LAYOUT_HIDE_NAVIGATION
 6                | View.SYSTEM_UI_FLAG_LAYOUT_STABLE
 7                | View.SYSTEM_UI_FLAG_LAYOUT_FULLSCREEN
 8                | View.SYSTEM_UI_FLAG_HIDE_NAVIGATION // hide nav bar
 9                | View.SYSTEM_UI_FLAG_FULLSCREEN // hide status bar
10                | View.SYSTEM_UI_FLAG_IMMERSIVE_STICKY;
11        systemUiVisibility |= flags;
12        view.setSystemUiVisibility(systemUiVisibility);
13    }
14}
2.Full screen of Dialog
——The AOSP bug in the native system will cause the navigation bar to pop up when the full-screen dialog is opened and then hide the navigation bar (splash screen).
 1public AlertDialog create(boolean fullscreen) {
 2    LayoutInflater inflater = LayoutInflater.from(context);
 3
 4    final AlertDialog dialog = new AlertDialog(context,
 5            R.style.DialogStyle);
 6
 7    if(fullscreen){
 8        SystemUIUtils.setStickFullScreen(dialog.getWindow().getDecorView());
 9    }
10}
3. How to avoid plugging in USB peripherals to cause app interface flicker In the AndroidManifest of the APP, add the following code
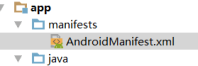
1android:configChanges="navigation|keyboardHidden|keyboard"
Wireless Debugging Guide
Suitable Devices (M2-Max, D1 , D1 Pro, Falcon 1)
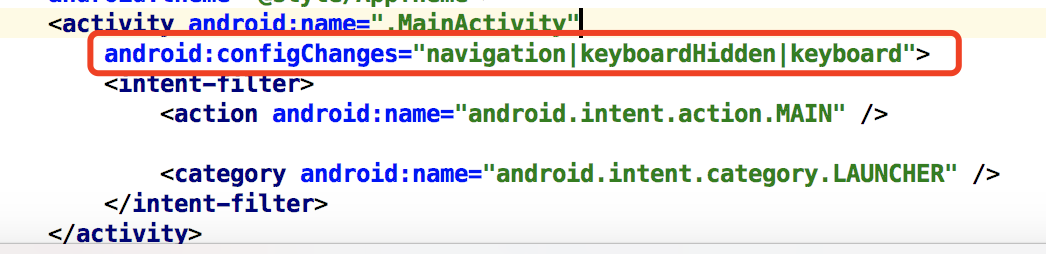
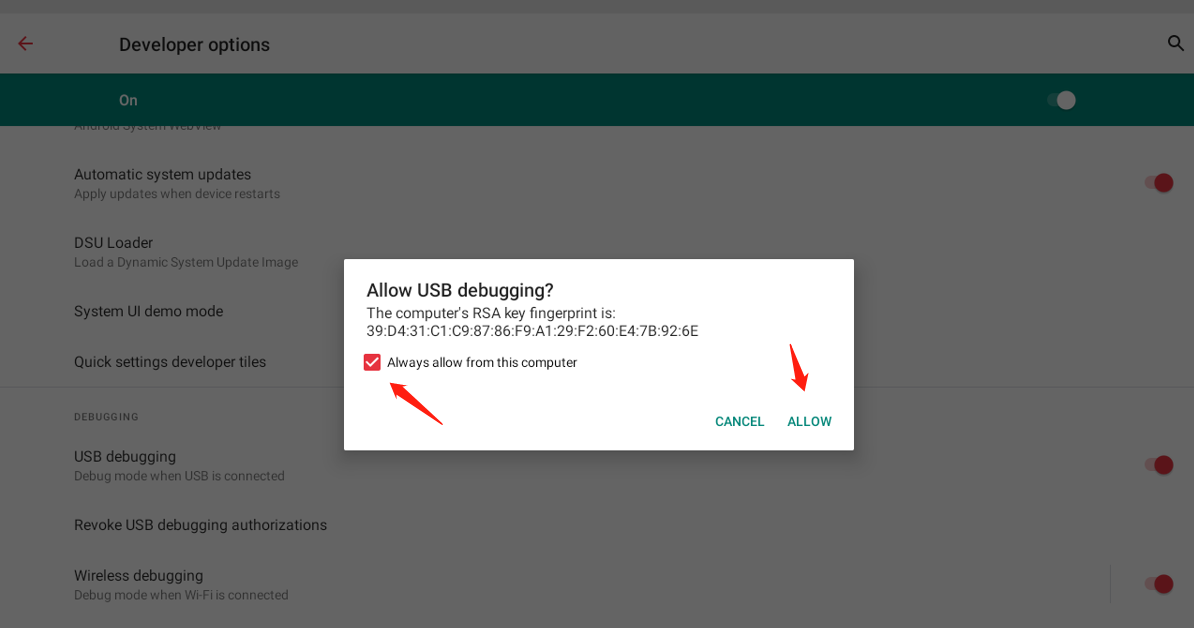
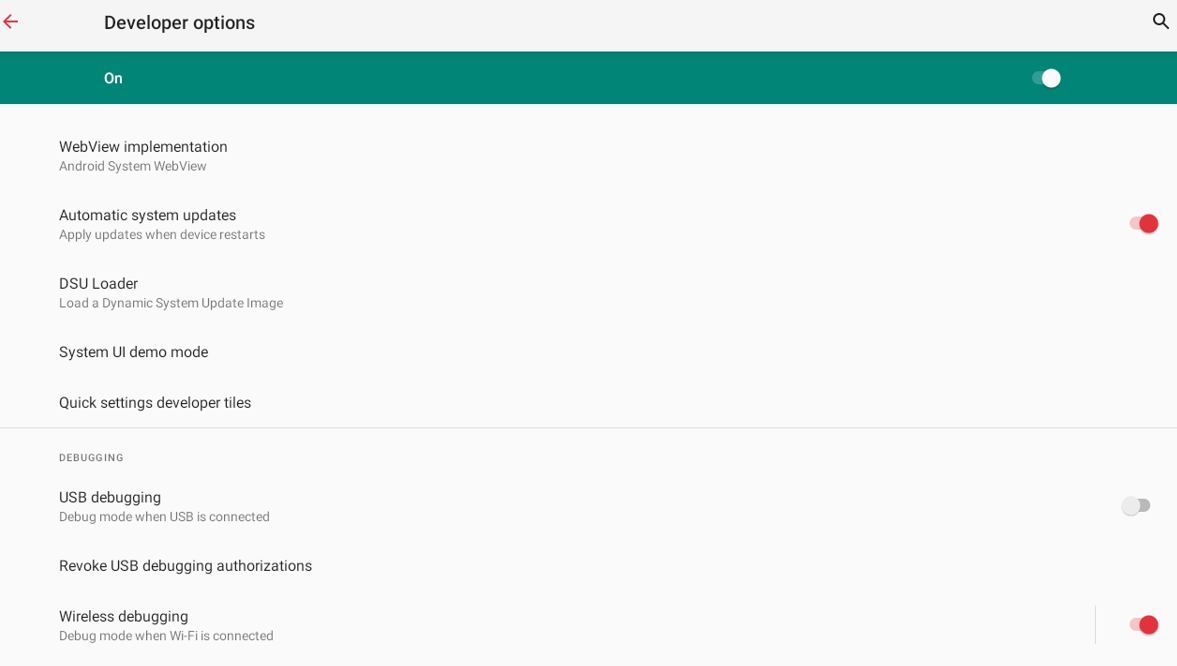
1.From the main menu, go to settings>developer options> turn on USB debugging and wireless debugging
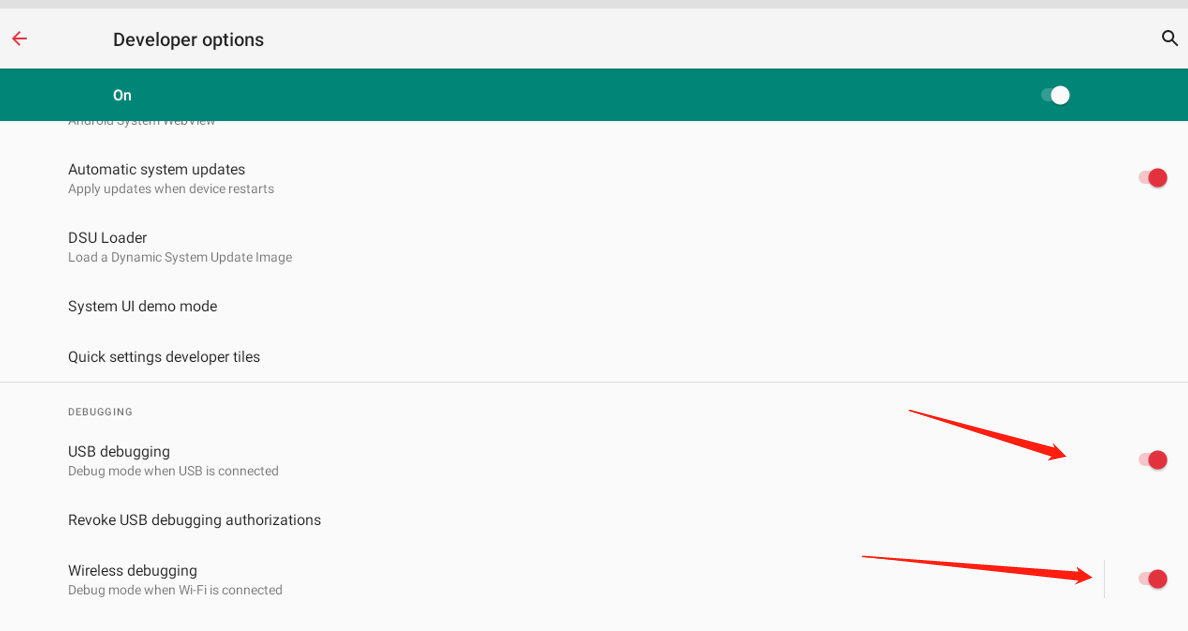
Link the device and PC with USB cable, under normal circumstances, from the notification bar, “USB debugging connected” will be shown. If this notification is not shown, repeat Step 1
From your PC, go to cmd.exe, insert adb tcpip 5555 (settings tcpip 5555)

Take note on during the first debugging, a popup will appear, click Allow to enable debugging.
Continue to execute adb shell ifconfig wlan0, check the IP address of the WiFI, obtain the wlan0 value beside the IP address.
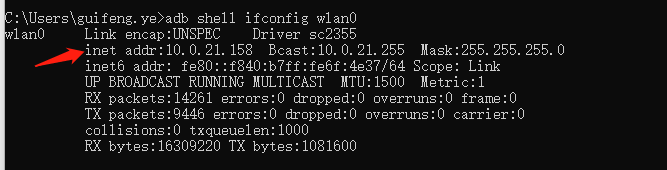
Execute adb connect IP (IP address is obtained from step 4), remarks: IP address of wifi connected to device must be the same network with PC

After connecting successfully, it will show as connected to IP
Remove USB cable, turn off USB debugging and Wireless debugging, Turn on WiFi debugging again, there will be a prompt to allow wireless debugging.

After clicking “Allow”
Settings are complete, execute adb shell to test the Wireless debugging result.